- Store
- Products
- Downloads
- Resources
-

How to work with Blackmagic 4K footage in Sony Vegas
If you need higher resolution, global shutter and a more creative depth of field then the Blackmagic Production Camera 4K models feature a large Super 35 size sensor and professional PL or EF lens mounts, absolutely is the perfect choice. With a built in 4K RAW and SSD recorder, it can record 4K videos in ProRes 422 (HQ) and compressed CinemaDNG files. However, if you try to import these amazing 4K footage into Sony Vegas for further editing, you'll find it a painful experience as error messages keep cropping up from time to time.
In order to find out the reason to the problem, the first thing we should check is whether Sony Vegas Pro is able to support lossless CinemaDNG RAW format. After visiting Sony Vegas Pro official tech specs, we can see that lossless CinemaDNG RAW format is not in the list of supported file formats. So in order that we can make Blackmagic 4K recordings editable with Sony Vegas Pro, may I suggest you to transcode Blackmagic 4K videos to MPEG-2 format which is well compatible with Sony Vegas Pro.
In fact, the process is surprisingly easy and can be done with the help of Brorsoft Video Converter. With it, you can effortlessly encode/re-encode Blackmagic 4K ProRes/CinemaDNG footage to MPEG-2/WMV for easy importing and editing in all versions of Sony Vegas. Besides Sony Vegas, this excellent program can also transcode any 4K videos including XAVC/XAVC S, 4K MP4, 4K MOV, etc to Windows Movie Maker, Davinci Resolve, Premiere Pro, Avid Media Composer, Pinnacle Studio and more editing software on Windows.

READ MORE: Blackmagic 4K in Adobe Premiere Pro
Converting Blackmagic 4K files to Sony Vegas
Step 1: Import source 4K videos
Drag and drop the Blackmagic 4K video files to the converter. You can also hit Add files button to import videos to the app. If you wanna combine several videos into one file, you can click the "Merge into one" box.
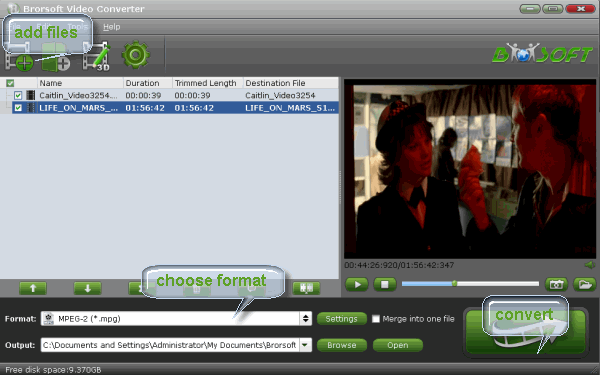
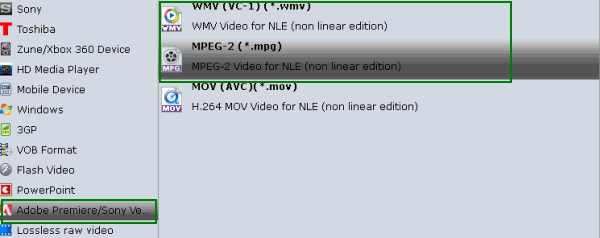
Step 2. Set Sony Vegas supported format
Click "Format" bar to determine output format. Follow "Adobe Premiere/Sony Vegas" and select "MPEG-2(*.mpg)" as the output format. Besides, you can also choose WMV (VC-1) (*.wmv) if you want to get a relatively smaller output file.
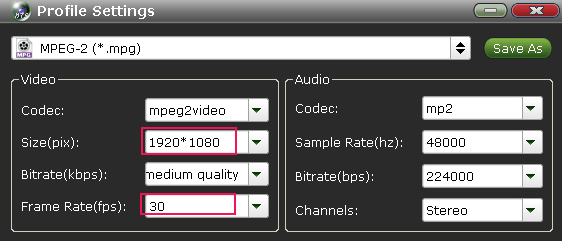
Step 3. Video/Audio quality settings
Adjust video and audio parameters, including the Bitrate of Video and Audio, the Codec of Video and Audio, Video Size, Sample Rate, Frame Rate, Audio Channels, etc., in the Profile Settings. Note: If you want to get original 4K resolution, just keep the video size as original.
Step 4: Start converting 4K footage
Click the "Convert" button to start the Blackmagic 4K to MPEG-2 conversion.
Once the conversion done, you can click "Open" button to get the output files effortlessly. Now you have got it right, just to import and edit Blackmagic 4K files with Sony Vegas Pro 8/9/10/11/12 at ease.
Related Products
Video Converter


Useful Tips
- 5 Best 4K Video Converter for Mac
- Best 4K Video Downloader
- 4K Ultra HD Video Converter
- Downscale 4K to 1080p
- 4K workflow with FCP
- 4K workflow with iMovie
- 4K workflow with Avidemux
- 4K workflow with Premiere Pro
- 4K workflow with Avid MC
- 4K workflow with Sony Vegas
- 4K Workflow with After Effects
- 4K Workflow with DaVinci Resolve
- 4K Workflow with Premiere Elements
- 4K Workflow with Movie Maker
- 4K Workflow with EDIUS
- 4K Workflow with HitFilm
- 4K Downscaling to 1080p
- 4K Workflow with PowerDirector
- 4K Workflow with Pinnacle Studio
- 4K AVC-Intra to Premiere Pro
- DJI Mavic 2 Pro 4K in Premiere Pro/FCP/Avid Media Composer
- Upload 4K Videos to YouTube
- Upload 4K Videos to OneDrive
- Play 4K in VLC
- Play 4K in Plex
- Play 4K in QuickTime
- Play 4K on Android
- Play 4K on Xbox One S
- Play 4K on Apple TV 4K
- Play 4K on Vizio TV via Kodi
- Play 4K on Shield TV via Plex
- Play 4K on PC without Lag
- Play 4K in Windows Media Player
Social Connection
Copyright © 2019 Brorsoft Studio. All Rights Reserved.