- Store
- Products
- Downloads
- Resources
-

How to Import Sony XAVC files to Vegas Pro 13/12
If you got some XAVC files from a camcorder like Sony A7S, Sony PXW-X70, Sony F55, Sony HDR-AS100V, etc, you would be eager to import XAVC footage into Sony Vegas Pro for further editing. While, it turns frustrating, Sony Vegas Pro 12/13 does not see XAVC clips. You may get an error statement. To get Vegas Pro work with Sony XAVC clips beautifully, the easy workaround is to convert XAVC to Sony Vegas natively supported MPEG-2 codec.
Although Sony Vegas Pro 13 states that it can input/output XAVC and XAVC S files, based on our testing and users feedback, we find it's not easy to edit XAVC footage(especially XAVC Long GOP) in Sony Vegas. If you want to import XAVC files to Sony Vegas Pro 12/13 flawlessly, we recommend you to convert XAVC to a more editable format for Sony Vegas Pro. To get the work done, you can take Brorsoft Video Converter, which is one of the best XAVC converter tool for you.
The program comes with several optimized format for Sony Vegas, which enable you to transcode XAVC clips to MPEG-2 for using in Sony Vegas Pro directly without any rendering or codec problems. Plus, it also allows you to convert Sony XAVC videos(from Sony PXW-X70, PXW-X160, PXW-X180, PXW-X200, PXW-X500...) to DNxHD for Avid Media Composer; ProRes for Final Cut Pro, Apple InterMediate Codec for iMovie, etc with best results. Download it and follow the tutorial below to convert XAVC files to Sony Vegas Pro effortlessly.
Free download the XAVC Video Converter:

How to Convert XAVC to MPEG-2 for editing in Sony Vegas Pro
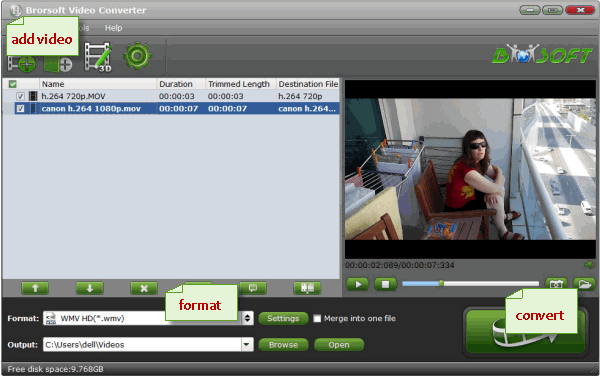
Step 1: Install the XAVC to Sony Vegas Converter and run it. Drag the XAVC files to the software. Or you can also click "Add" button on the top of the main interface to import video to the program. It supports batch conversion and joining multiple video clips into one file.
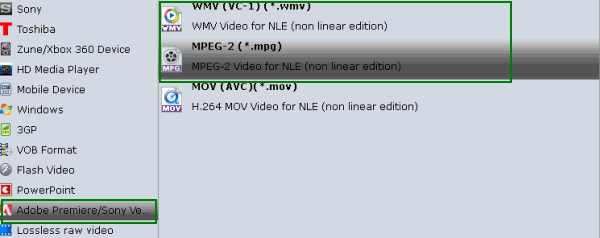
Step 2: Click "Format" bar to determine output format. Follow "Adobe Premiere/Sony Vegas" and select "MPEG-2(*.mpg)" as the output format. Besides, you can also choose WMV (VC-1) (*.wmv) if you want to get a relatively smaller output file.
Step 3: In case the default settings do not fit your requirement, you can click "Settings" button and enter "Profile Settings" panel to adjust video size, bit rate, frame rate, sample rate and audio channels. If you want to keep you 5.1 Audio Channels, please set ac3 as audio codec.
Step 4: Click the "Convert" icon under the preview window to start encoding XAVC for working with Sony Vegas Pro 13 as well as Vegas Pro 10/11/12.
Once the conversion completes, you can click "Open" button to get the output files. Now you have got it right, just to import and edit XAV with Sony Vegas Pro.
Related Products
Video Converter


Useful Tips
- Import XAVC to After Effects
- Import XAVC to Pinnacle Studio
- Import XAVC to iMovie
- Import XAVC to Premiere Pro
- Import XAVC to Sony Vegas Pro
- Import XAVC to Final Cut Pro
- XAVC to Premiere Elements
- XAVC in Avid Media Composer
- XAVC in Windows Movie Maker
- XAVC S Format Introduction
- XAVC S to Final Cut Pro
- XAVC S to iMovie
- XAVC S to Avid
- XAVC S to Lightroom
- XAVC S to Adobe Premiere
- XAVC S to Sony Vegas Pro
- XAVC S to Sony Movie Studio
- XAVC S to PowerDirector
- XAVC S to Davinci Resolve
- XAVC S to Windows Movie Maker
- Upload XAVC S to YouTube
- Upload XAVC S to Facebook
- Convert XAVC S to ProRes
- XAVC S Converter for Mac
Social Connection
Copyright © 2019 Brorsoft Studio. All Rights Reserved.