Burn Panasonic TM900 1080/60p MTS to Blu-ray with Roxio Toast
The HDC-TM900 High definition Camcorder is the upgraded successor of the TM700 and a high-level HD offering from Panasonic. With the transfer rate of 28 Mbps, its MTS videos recorded as 1080/60p conveys about twice the information of the 1080/60i recording. Besides the widely praised HD mode, it has many other fantastic features which include a 32GB internal flash memory, an SD memory card slot, the option to record in 3D, and a quality image sensor system. These features alone give you detailed, beautiful images, a plethora of recording space, and the ability to shoot fun and unique movies in 3D with an optional lens.- Due to all these desirable features, the Panasonic TM900 is highly chose for shooting 1080/60p MTS videos and used to record the beautiful memory of holidays. But an increasing number of the Panasonic TM900 users are wondering how to burn their 1080/60p MTS videos to Blu-ray so that they can share them with their family members or friend on a bigger screen or store them for long-time memory. Then the Roxio Toast, which is much simpler and less expensive, is the best and most favorable burning soft ware to help you accomplish the task.
- The Roxio Toast has long been the flagship of disc burning, often supporting that Apple’s native burning software did not. With it, you can burn your HD video content to discs that can be played on most commercial Blu-ray players. It is said that the Roxio Toast can recognize the videos from HD video cameras/camcorders, but the converting from 1080/60p MTS to H.264 HD Video (*mov) is more recommended to get rid of any problems during burning. Out of this reason, the users should firstly convert the HD MTS videos to the HD MOV fiels with the best Panasonic TM900 1080/60p to H.264 HD Video(*mov) Converter. Here is the step-to-step guide for burning Panasonic TM900 1080/60p MTS to Blu-ray with the Roxio Toast.
- The steps for converting:
Step 1: Import your Panasonic TM900 1080/60p MTS videos to the best Panasonic TM900 1080/60p to H.264 HD Video (*mov) Converter.
Use USB cable to connect HDC-TM900 to Mac. Launch and then click the adding button to import HDC-TM900 1080/60p MTS videos to t the best Panasonic TM900 1080/60p to H.264 HD Video (*mov) Converter. You can tick the box in front of the file you want to convert. If it is necessary, you can double click the each file to have a preview. - Step 2: Choose the H.264 HD Video (*mov) as the output format and set the output folder.
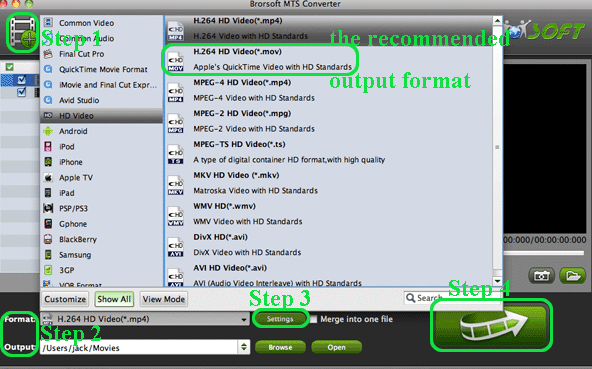
Click and get the dropdown list of the setting, then move your pointer to the HD Video. Under the sub list is the H.264 HD Video (*mov) which you should select as the output format. After that, you can set the output folder by clicking “Browse” icon as you need. - Step 3: Click “Settings” icon to adjust audio and video parameters.
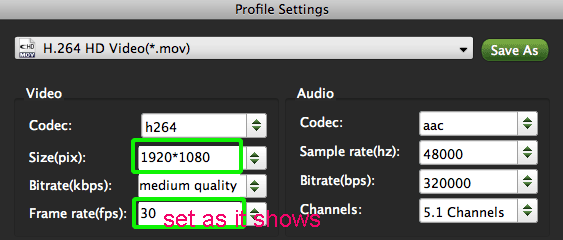
Click the “Settings” icon and you will go into a new interface named “Profile Settings”. You can adjust codec, bit rate, frame rate, sample rate and audio channel in the interface according to your needs and optimize the output file quality.
Note: You’d better set the video frame rate as 30fps, video size as 1920*1080 to keep the best quality for burning Blu-ray with the Roxio Toast.
- Step 4: Start converting your Panasonic TM900 1080/60p MTS to H.264 HD Video (*mov) for burning Blu-ray with Roxio Toast.
Click the “Convert” button; it will convert HDC-TM900 MTS to H.264 HD Video (*mov) for burning Blu-ray with Roxio Toast on Mac immediately. You can find the process in the “Conversion” interface.
- Then let’s get burning:
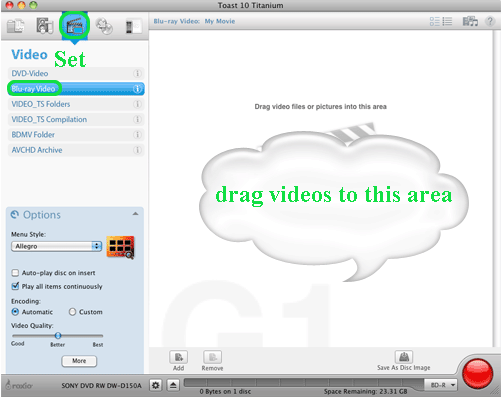
Step 1: Set Toast up to burn a Blu-ray Video Disc.
Launch Toast and click the “Video” button in the upper-left portion of the screen, and select “Blu-ray Video” from the menu that appears beneath it. - Step 2: Add your HD Videos (*mov) converted with the best Panasonic TM900 1080/60p to H.264 HD Video (*mov) Converter.
Drag the video or videos you want to burn into the right side of the window. If you have more than one video, please choose the order in the way which they play and/or appear by dragging them until they appear as you like.
- Step3: Adjust disc options.
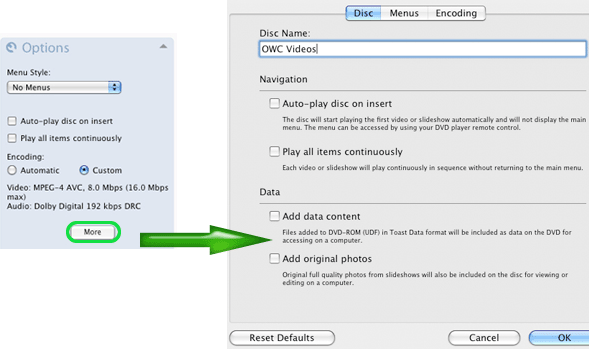
In the lower left portion of the window will be Options menu. If it is not extended already, click on it to reveal the options for the disc. It should look something like the image at right. You can click on the “More” button to bring up the full Options window.
- Step4: Tweak the clips
To adjust either parameter, click on the “Edit…” button next to the track you want to edit the information for. In the Text tab, the first line is how the button text appears in the menu. The other lines can usually be left as-is. In the Video tab, you can select the frame to be used as the button picture by selecting a frame using the playback bar and your left and right arrow keys. Once you have the frame you want selected, click the “Set Button Picture” button.
If you wish to set basic chapter markers, use the “Chapter Markers” menu. Otherwise, just leave it as-is.
Click “Done” and repeat the process for any other movies that may be on the disc. - Step 5 - Encode.
Below the window is a big red button with an indicator showing what kind of disc you’re burning to and how full it will be when you’re done to its left. Select “BD-R” for the disc type and click the “Save as Disc image” button. You will be prompted to choose a location to save the image. Once you do, the encoding will begin. - Step 6: Start to burn your HD Videos (*mov) converted with the best Panasonic TM900 1080/60p to H.264 HD Video (*mov) Converter.
Once the disk image is done, you should click the “Copy” icon in the upper left corner. Select “Image File” in the menu that appears on the left. Drag the disk image you just created into the window on the right. After that, put a recordable Blu-ray disc into your burner and click the big red button.
The burning window will appear. Use the “Recorder” menu to select the burner, if you have more than one. Click the “Record” button and the burning process will begin.

- Once the burn is finished, you will have a Blu-ray disc which you can use in your home Blu-ray player.
- Tips:
1. To get more tips for Panasonic camcorders and cameras, you can refer to Panasonic video camera Tips and Tricks that will do you a favor. - 2. the best Panasonic TM900 1080/60p to H.264 HD Video (*mov) Converter can also allow you to convert HDC-TM900 AVCHD 1080/60p MTS to FCE, iMovie friendly format and codec for editing. You can link to Brorsoft AVCHD MTS Converter for Mac to get more information.
Related Guide
View/Read/Edit/Playback Panasonic DMC-TZ10 AVCHD Lite on Mac
Transcode Panasonic DMC-FT1 AVCHD Lite to iMovie for editing
How to convert/Edit Panasonic HS60/TM60/SD60 AVCHD/MTS on FCP?
Bring Panasonic HDC-TM700 MTS to iDVD for Burning