- Store
- Products
- Downloads
- Resources
-

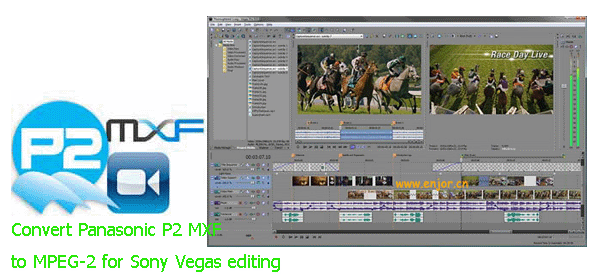
Panasonic P2 MXF to MPEG-2- Import P2 MXF form Panasonic P2 Camera into Sony Vegas
If you are familiar with the professional broadcasting camera-recorders like Panasonic P2HD series(including AG-HVX200, AJ-HPX3100, AG-HPX250, AJ-HPX3700, AG-HPX170, AG-HPX500, AG-HPX370, etc), you would get to know that they use MXF container format to record movies, commercials and other high-end film and TV productions. Files are saved onto the P2 card in MXF format. While, if you are using Sony Vegas Pro to perform further editing, you will find Sony Vegas Pro does not work well with the Panasonic P2 MXF videos.
As a matter of fact, Sony Vegas claimed that it supports AVCHD, WMV, MPEG-2, MOV, Sony MXF, etc, but P2 MXF isn’t included. When launching Sony Vegas, it seems impossible to drag Panasonic P2 MXF clips to timeline. Anyway, since Sony Vegas can’t recognize Panasonic MXF files, how to import P2 MXF into Sony Vegas form Panasonic P2 Camera for further editing?Below is the easiest solution to it.
We’ve learned that, Sony Vegas deals very well with MPEG-2, WMV files. With the best P2 MXF to MPEG-2 Converter we highly recommend here, you can convert/transocde P2 MXF to MPEG-2 for Sony Vegas easily with especially preset profiles. If you have any problem like P2 .mxf file import issue, squeezed video or wrong aspect ratio, you may follow the guide below about how to convert and import Panasonic P2 MXF to MPEG-2 for Sony Vegas editing.
Step 1: Download and launch the best P2 MXF to Sony Vegas Converter to add P2 MXF vidoes.
Click the Add button to import P2 MXF clips directly from a P2 card to the program.
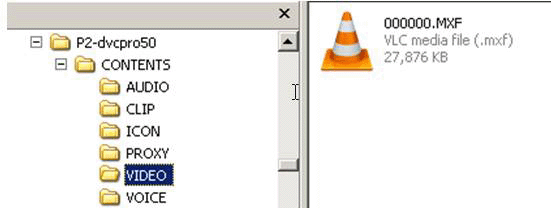
Tip: You should note P2 MXF has a special structure that all media essence stored in different folders, say, video and audio files are kept in separate folder. You can load MXF files from CONTENTS>>VIDEO to this program, you’ll not trouble yourself to load audio file again since this P2 MXF Converter can automatically match audio with the imported video.
Step 2: Choose MPEG-2 as the output format for Sony Vegas.
Click on the dropdown menu of “Format” and then move your pointer to Adobe Premiere/Sony Vegas > MPEG-2, which is the Sony Vegas compatible video format. Afterwards, you can set the output folder.
Step 3: Customize audio/video settings for Sony Vegas.
Click the “Settings” icon and you will go into “Profile Settings” interface. You can adjust codec, bit rate, frame rate, sample rate and audio channel according to your needs and optimize the output file quality. Here we recommend 29.97fps as frame rate and 1920*1080 as video size while exporting.
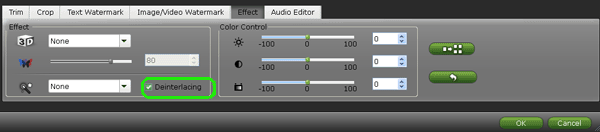
Note: Before start the conversion, click Edit button and you can deinterlace 1080i P2 MXF files for Sony Vegas via checking off the “Deinterlacing” box in the Video Editor.
Step 4: Convert Panasonic P2 MXF to MPEG-2 for Sony Vegas.
Click the convert button and the Panasonic P2 MXF Video Converter will start converting P2 MXF to MPEG-2 for Sony Vegas. After the conversion, import the MPEG2 videos to Sony Vegas for editing without any trouble.

Related guide:
Join/Display Canon XF300/XF305 raw MXF files to PS3
Merge/Convert/Import MXF files to Adobe After Effects
Transfer/Import Canon EOS C300 1080i MXF to Sony Vegas Pro
Transcoding Canon MXF footage to DNxHD mov for Avid Media
Import/Merge Canon XF100 MXF files to Windows Live Movie Maker
Import/Merge Canon XF100 MXF files to Windows Live Movie Maker
Import/Transcode Panasonic AG-HVX200 P2 MXF files to PowerDirector 10
mporting MXF files from Canon XF/Sony XDCAM to Windows Movie Maker
Import/Transcode Panasonic AG-HPX250 P2 HD MXF files to Adobe Premiere CS5.5
Related Products
MXF Converter


Useful Tips
- Convert MXF to MOV
- Play MXF in VLC
- Play MXF in Media Player
- Upload MXF to YouTube
- Convert MXF to AVI/WMV/MPEG
- Transcode P2 MXF to ProRes
- Import MXF to After Effects
- Convert Canon MXF to Avid
- Import MXF to iMovie
- Convert MXF to Premiere
- Convert MXF for Mac editing
- Convert MXF to Pinnacle Studio
- Convert MXF to PowerDirector
- Load Sony MXF to Final Cut Pro
- Edit MXF files with Davinci Resolve
- Sync MXF with Pluraleyes 3/3.5/4
- Edit MXF in Camtasia Studio 8/7
- Convert MXF to Windows Movie Maker
Find us on Facebook

Adwards

Copyright © 2019 Brorsoft Studio. All Rights Reserved.