Convert/Transcode Sony HDR-CX 160 1080/60P, 1080/60i AVCHD to Adobe Premiere CS5.5 for Getting Slow Motion

Slow motion (or slow mo for short) is a ubiquitous effect in film-making whereby time appears to be slowed down and it has been adopted by a diverse range of directors to achieve various effects. The three classic usage of slow motion include: Athletic activities of all kinds, to demonstrate skill and style, to recapture a key moment in an athletic game, typically shown as a replay and Natural phenomena, such as a drop of water hitting a glass. It can also be used for artistic effect to create a romantic or suspenseful aura or to stress a moment in time. Inception, for instance, is one of the top 10 movies which are appropriately used the slow mo to show that one dream is slower than the next.Now an increasing number of shutterbugs are interested in getting the slow motion which can make the screen capturing more easier.- Then how to get the slow motion is what should be solved firstly. The easiest way, according to the definition is to change the original Frame Rate to a relative slower one, which is a rather complex process.
- The Sony HDR-CX 160 can record your life into various optional formats, such as the HD: 1920x1080/60p, 60i, 1440x1080/60i; STD: 720x480/60i. But none of them are suitable for getting slow motion via the latest Adobe Premiere CS 5.5. The MTS files captured by the Sony HDR-CX 160 need converting to 24p MOV format which is compatible with the Adobe Premiere CS 5.5, which can edit the converted files to get the slow motion. The top Sony HDR-CX 160 to Adobe Premiere CS5.5 Converter, the Brorsoft MTS Converter, can perfectly accomplish the task to transcode 60p/60i AVCHD to 24p MOV. You can easily fulfill the complicated work by follow the steps listed below.
- Preparation: connect the Sony HDR-CX 160 to your computer with USB cable and transfer the H.264 MTS footages into hard drive by following the camera folder AVCHD > BDMV > STREAM.
- Step 1:Import HDR-CX160 1080/60P, 1080/60i AVCHD to the best Sony CX160 AVCHD to Adobe Premiere CS5.5 Converter.
Launch Sony CX160 AVCHD to Adobe Premiere Converter. Click the button for adding to import HDR-CX160 1080/60P, 1080/60i AVCHD to the best Sony CX160 AVCHD to Adobe Premiere Converter Converter. You can tick the box in front of the file you want to convert. If it is necessary, you can double click the each file to have a preview.
Tip: If you have multiple MTS/M2TS video files, you can tick the “Merge into one” box to combine the multiple video files into one single file so that you can play these files without interruption. - Step 2: Select the output format which is specialize for Adobe and set the output folder.
Click the format box and you will get a drop-down list in which the last but one is what you need: Adobe Premiere/Sony Vegas> MOV (AVC) (*.mov). Then you can set the output folder by clicking “Browse” icon as you prefer.
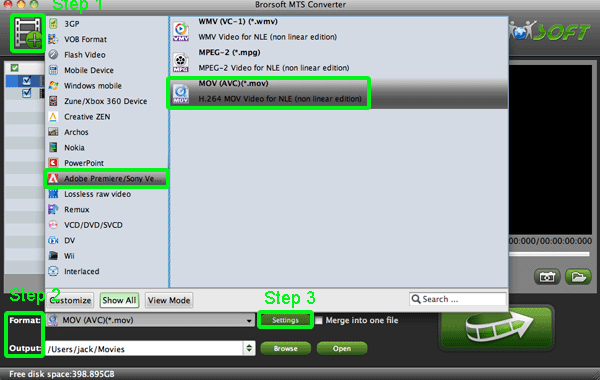
- Step 3: Click “Settings” to adjust audio and video parameters.
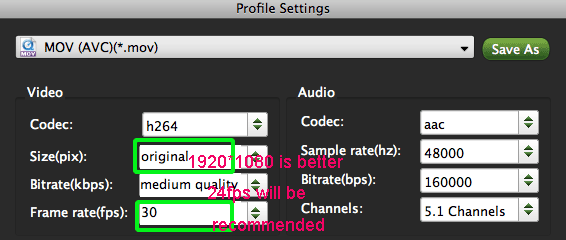
Click the “Settings” icon and you will get a new interface named “Profile Settings”. You can change the default codec, bit rate, frame rate, sample rate and audio channel according to your needs and optimize the output file quality.
Note: You’d better set the video frame rate as 24fps, video size as 1920*1080 if you attach great importance to high quality and keep 5.1 channels to keep the best quality for editing in Adobe Premiere.
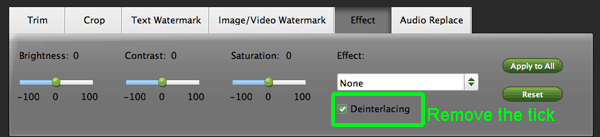
- Tip: If the frame rate of your MTS files is 60p, you’d better remove the default setting “Deinterlacing” in the “Effect”. Otherwise the converted files will be a little jerky.
- Step 4: Start converting your HDR-CX160 1080/60P, 1080/60i AVCHD MTS to MOV 24p for Adobe Premiere CS5.5
Click the “Convert” button; it will convert/transcode the HDR-CX160 1080/60P, 1080/60i AVCHD MTS to Adobe Premiere CS5.5. . You can find the process in the “Conversion” interface. - After converting the MTS file, you can click the “Open” button and add the MOV 24p file to Adobe Premiere without any problem. Then you should turn to the frame hold window, check (or click) on the frame blending and reverse the clip according to the wise manual: Clip-->Filter-->Reverse. There is another much easier way you should have a try: Right click on clip -> Speed -> -100%! But the -100% trick may mess up the field order! (Result will be jerky video). But for digital at least, maybe it should be avoided. The Reverse-filter is safer. Another point you need to pay attention to is there is also the Windows version of the Brorsoft MTS Converter and the Adobe Premiere CS5.5. The procedure to get the slow motion is the same as that of the Mac version.
- After all the steps can you enjoy the special effect of the slow motion which can make your holiday memory more beautiful and unforgettable. If you want more information about the software, you can give the Brorsoft Sony AVCHD to Adobe Premiere CS5.5 a go.
Related Guide
AVCHD iMovie Converter— Convert/Import AVCHD to iMovie 11 on Mac
Import HRD-CX360V MTS/M2TS Videos to Final Cut Pro 6.0 without trouble
Convert HDR TG7/TG7E/TG7V 1080 MTS to AIC MOV for FCE
Import Sony HDR-TG3/TG3E MTS files to FCE with MTS to AIC MOV Converter