- Store
- Products
- Downloads
- Resources
-

How to Rip/Edit DVD on Mac OS X ?
Hi, baby! Have you encountered the trouble?
When you want to watch and enjoy interesting DVDs on iMove, QuiteTime, etc. the DVDs are not recognized by them. As a Mac user, I had the same experience. And finally I found out a professional and all-in-one DVD ripper for Mac adopted advanced audio and video sync technology-Brorsoft DVD Ripper for Mac which can easily and fastly help me rip any DVD to all sorts of video and audio formats with excellent output quality on Mac OS X to iMove, FCP, QuiteTime, etc.
Moreover, it offers several powerful functions to improve and perfect the DVD for my great enjoyment, like cropping, trimming, merging, replacing audio and so on.
Here I would like to share my experience with you.
Step 1. Download and install Brorsoft DVD Ripper for Mac
Step 2. Add the DVD file into the program by clicking “DVD Rom”, “DVD Folder” or “IFO/ISO” button.
Step 3. Select output settings and the destination folder
After click the “Settings” button, a profile window will popup and then you can select a format according to the name of your player. For example, you can select “MOV-QuiteTime (*.MOV)” when you want to rip DVD to QuiteTime on Mac, and the default settings will work greatly for you. Actually this Mac DVD Ripper can rip DVD to MP4, 3GP, AVI, MPG, FLV, MOV, 3G2, VOB, MP3, FLAV, MKA, OGG, WAV, AV3, M4A, MPEG-4, etc. iMovie supports MOV and MP4 video, so with this Mac DVD ripper it is easy to rip DVD to iMovie on Mac.
Step 4. Start Conversion by clicking the “Start” button
Powerful and wonderful editing functions:
1. Trim Video
Click the “Trim” bar to split the current title or chapter by dragging the Start Time slider to set the start time, and dragging the End Time slider to set the finish time. Then you can rip any segment from DVD on Mac as you like.
2. Crop Video
If you hate the black edges or letterboxed and want to remove them from your video, you can click the “Crop” button to easily and freely crop the unwanted parties via two ways, that are dragging the frame around the video and setting the crop values: Top, Bottom, Left and Right.
3. Merge into one file
Check the opinion on the main interface “Merge into one file”, you can combine several DVD files together to enjoy them without any interrution.
4. Effects
You can watch the video at “Preview Pane” and then set brightness, contrast, saturation and adjust the volume to perfect the effect of the original video.
In addition, you can add various special effects like simple gauss blur effect, simple laplacian sharpen, gray, flip color, invert, aged film on DVD clips.
Moreover, you can also check the option Deinterlacingto convert interlaced video into a non-interlaced form, so that you can enjoy a better and clearer video effect after conversion.
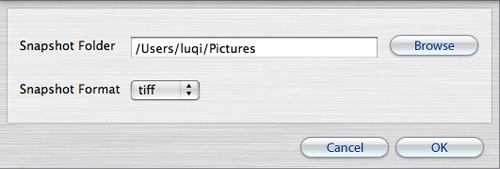
5. Capture pictures
With the program, you can preview the video in the preview window on the left of the main interface. So you can capture pictures by clicking “Snapshot” button. After that clicking the folder icon or you can specify the folder where to save the pictures.
Okay, that’ s all. Hope this Mac DVD Ripper can open your eyes!
You May Be Interested in This Item
Do it all – Convert, Edit Video and Rip, Backup Blu-ray and DVD movies, 250 formats, Ultra-Fast encoding speed, ZERO quality loss!
With it you can rip the Blu-ray, DVD disc as well as converting the video files for playing on Galazy Book on-the-go.


More Guides:
Rip Netflix DVD to Videos
Bypass DVD Region Codes
Rip DVD on Mac Mavericks
Speed Up DVD Ripping Process
How to Copy main movie from a DVD
Blu-ray Player and DVD Player Comparison
Compare DVD Ripper VS Blu-ray Ripper VS Video Converter Ultimate
Related Products
DVD Ripper


Useful Tips
- Rip DVD to Android
- Rip DVD to Plex Media Sever
- Convert DVD to AVI
- Convert DVD to MKV
- Convert DVD to WMV
- Convert DVD to USB Drive
- Upload DVD to Dropbox
- Rip DVD with VLC Player
- Rip DVD to NAS
- Import DVD to iTunes
- Convert ISO to iTunes
- Rip DVD in Windows 8
- iPhone 6 DVD Playback Tips
- Stream DVD to Chromecast
- Edit DVD in Final Cut Pro
- Edit DVD in Adobe Premiere Pro
- Convert ISO to MP4
- Import DVD to iMovie
- Copy Full DVD Disc
- Rip DVD to iPad
- Rip DVD to Galaxy Tab
- Rip DVD on Yosemite
- Rip DVD on macOS Sierra
- Rip DVD with Handbrake
- Mac TheRipper Alternative
- Rip DVD with Subtitles
- Add Subtitles to Hollywood DVD
- Upload DVD to Vimeo
- Upload DVD to YouTube
- Rip and Copy Redbox DVD
- Rip DVD to MP4/M4V/MOV
- Import DVD to Windows Movie Maker
- Load DVD to PowerPoint
Find us on Facebook

Adwards

Copyright © 2017 Brorsoft Studio. All Rights Reserved.