Import HRD-CX360V MTS/M2TS Videos to Final Cut Pro 6.0 without trouble

With its back-illuminated "Exmor R" CMOS sensor, the HDR-CX360V HD Handycam camcorder delivers superior low-light video. It’s also offers 1920×1080 high definition resolution letting you record your memories in Full High Definition quality. The built-in 32GB embedded Flash memory can record and store up to 13 hours of high definition video footage with HD LP mode. The Full HD 60p recording capabilities offer incredibly detailed playback of your precious memories. The wide angle Sony G Lens lets you capture more of the action with sharp images and brilliant, accurate colors.- As the popularity of HRD-CX360V camcorders, more and more people have become owners of such a kind of camcorder, in the meantime, the problem emerged that the old version FCP can not directly recognize MTS and M2TS files shot by HRD-CX360V camcorder. With the special intention of solving this problem, this article will show you how to import MTS and M2TS files to FCP 6.0 via the help of Brorsoft MTS/M2TS Converter for Mac.
- What will Brorsoft MTS/M2TS Converter do is converting HDR-CX360V MTS and M2TS files to FCP compatible formats. Following is the detailed user instructions for you.
- For the preparation of video converting, please free download Brorsoft MTS/M2TS Converter for Mac and install it.
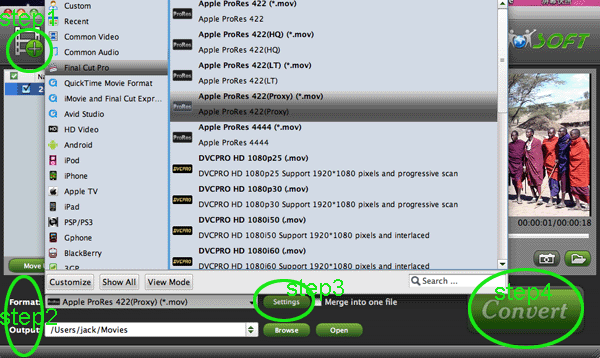
- Step1: Add CX360V MTS/M2TS files to the best HDR-CX360V Converter.
Launch the best HDR-CX360V Converter program, and then click the “Add” icon to import the CX360V 1080P MTS videos. - Step 2: Select FCP compatible format as output format and set save path.
Click the drop-down list of “Format” to select FCP compatible format as output format, here I choose Apple ProRes 422(Proxy) (*.mov) for example. Click “Browse” button to specify where to store the output files. Moreover, if you have the need of combining multiple MTS and M2TS as a single file, you are able to achieve this goal via ticking the checkbox “Merge into one file”. - Sep 3 : Set advanced settings.
Click “Settings” button, then you will see the following interface, on which you are allowed to adjust audio and video parameters like codec name, bit rate, aspect ratio, frame rate, and audio channel. - Step 4: Start the HDR-CX360V MTS to Apple ProRes MOV conversion.
Once finished the above settings, click the “Convert” icon to start the HDR-CX360V 1080P MTS to Apple ProRes MOV Conversion.

After the MTS to Apple ProRes MOV conversion, you can click “open” button to locate the converted video files and then import the output files to Final Cut Pro 6.0 for further editing. - Tips: Brorsoft M2TS Converter for Mac supports other functions:
Support input AVCHD/ AVCHD Lite footage (*.mts, *.m2ts) at 1080i, 1080p, 720i, and 720p. Allow selecting desired video clips to convert, cutting off unwanted areas, merging multiple files into a single one. It adopted advanced audio and video sync technology which never let you troubled by the audio and video issues. If you want to convert more other videos such as Tivo, MKV, FLV, AVI, MPEG, etc. you can refer to Brorsoft Video Converter for MAC.
 Trust ourselves & embrace the world!