“I have a problem with the Sony VG20 and my Mac. I tried to open it with iMovie or Adobe Premiere PRO CS5, but neither way anything shows at my desktop as an external disk, just shows a warning reading 'do not recognize the format of this disk', simply do not show anything, either at the iMovie or Adobe CS5.”
“Hey everyone! I am sure this has already been addressed before, but I've searched (both here and all over the web) and CANNOT find anything that plainly details how we, with the Sony VG20 MTS format, are supposed to import video into Premiere Pro. Can somebody please help me?!?!?”
The Sony NEX-VG20 is designed to replace 2010's NEX-VG10. The new model brings a few interesting improvements, including a CMOS sensor with a boosted resolution of 16 Megapixels and, more importantly, a progressive scan mode (50p/25p), in line with the product's movie-maker market position.
The video format from Sony NEX-VG20 is AVCHD 1080/60p or 1080/50p. We can easily notice that it adopts AVCHD V2.0 codec that is simply a compression algorithm which allows vast amounts of data to be compressed to relatively small disk space. The benefit of compression is reduced disk space but a difficulty can arise when we come to edit this stream of data.
Since the Sony NEX-VG20 AVCHD can not be supported by Adobe Premiere natively, you may need to transcode Sony NEX-VG20 AVCHD to Adobe Premiere Pro compatible format on your Mac first. As far as we know, the MEPG-2 format is the most editable video format for Adobe Premiere Pro.
So the next important step is to find a professional Converter to transcode the AVCHD to MPEG-2.
Here, Brorsoft MTS to Adobe Premiere Converter for Mac is highly recommended to you which is professional on transcoding Sony NEX-VG20 footage to Premiere Pro preferred MPEG-2 encoded MPG file without quality loss.
Free download the MPEG-2 Converter for Premiere Pro
 (Note: Click here for OS X 10.5)
Converting Sony NEX-VG20 AVCHD 2.0 to MPEG-2 for Premiere Pro
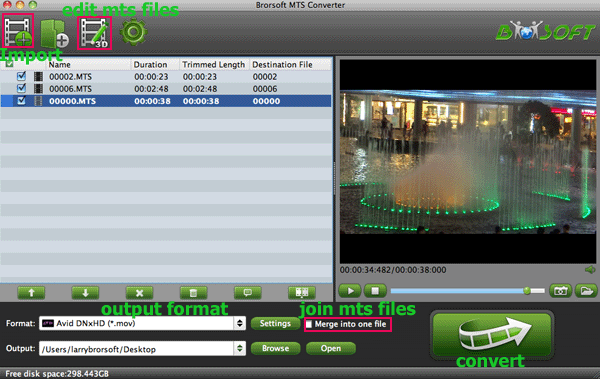
Step 1: Import Sony NEX-VG20 AVCHD
Set up the professional MPEG-2 Converter for Premiere Pro on Mac and run it. Click “Add” button on the main interface to load your MTS/M2TS recordings.
Tip:
1. If necessary, you can click the button "Merge into one" to combine several videos to one file to save your conversion time.
Step 2: Select output format
Click the format bar or the pull down menu of “Format” to select output format.
To edit AVCHD videos in Adobe Premiere, then Adobe Premiere/Sony Vegas > MPEG-2 (*.mpg) is the suitable video format.

Step 3: Start Conversion
Click the Arrow button on the main interface to start Sony NEX-VG20 to Premiere Pro MPEG-2 Conversion. You can check the process all the time.
Once the process is at 100%, then the converted video is ready for importing to Adobe Premiere Pro for editing. Click the “Open” button to get the transcoded video.
Tip:
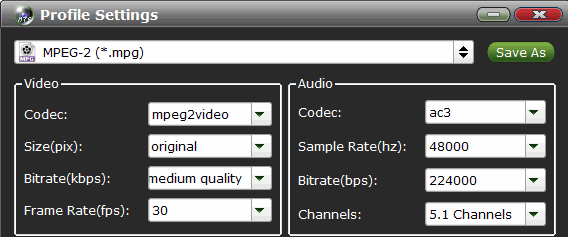
Adjust the video and audio parameters, including the Bitrate of Video&Audio, Video Size, Sample Rate, Frame Rate, Audio Channels, etc., by clicking the Settings button on the main interface for getting the best quality before starting conversion.
Related Guides:
How to import Sony NEX-VG20 footage into FCP X
Convert Sony 60p/50p AVCHD to DNxHD for Avid MC
Convert Sony 60p MTS files for editing in iMovie smoothly
Importing 60p AVCHD footage into Sony Vegas Pro
