Yosemite Video Converter: How to Convert Video on Mac OS X Yosemite
As you see, the new launched Mac OS X Yosemite starts with a flatter, more modern look, smarter controls and streamlined toolbars, etc. Working on Yosemite is full of fresh and convenience. Meanwhile, people also have a question haunting around their minds: is it available for us to convert videos on Yosemite the same as the former OS X? In fact, many users find that legacy video converter couldn't be port easily to this new platform. Based on this reason, we will pick up the best Video Converter for Yosemite for you. Read on to get it.
To help users to find the best video converter for Yosemite 10.10 among plentiful Mac video converters, we need to do some work. Take the features like, input/output formats, supported OS X, advanced functions, etc into account, here we highly recommend Brorsoft Video Converter for Yosemite, which always keeps consistent update that is fully compatible with the new OS X 10.10 Yosemite system.
This versatile Video Converter Yosemite is able to make lossless video conversion available on the latest Mac Yosemite as well as Mavericks, Mountain Lion, Lion... operating system. With it, you can convert HD videos, convert online videos in multiple file formats such as MP4, WMV, AVI, MKV, FLV MOV, VOB, MPG, MTS and more. Plus, it's was built in with 200+ preset profiles, so you can put videos to your mobile devices without any effort like iPhone, iPad, Apple TV, HTC One, Samsung Galaxy S4/S5, Galaxy Tab 3/4, Nokia Lumia, PS Vita, etc. Not only working as a top Mac OS X 10.10 Yosemite video converter, this software also serves as a video editor, video player on Yosemite to meet your needs.
Download the best Video Converter for Yosemite:
Guide on Converting Video on Yosemite with the Best Yosemite Video Conversion App
1. Import the video files
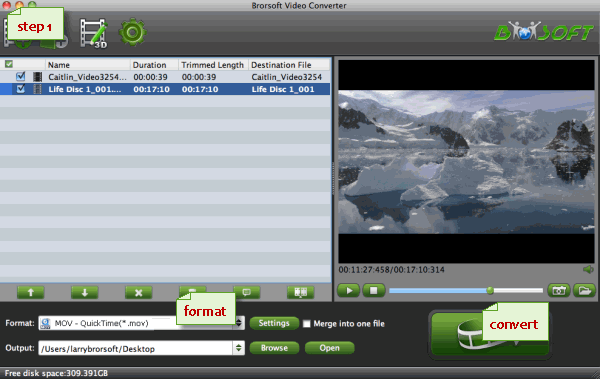
Install and open the video converter tool on your OS X 10.10 Yosemite. Click the "Add Files" button to import video files into the application. It supports batch importing so that you can add as many video files as you wish.

2. Set output format
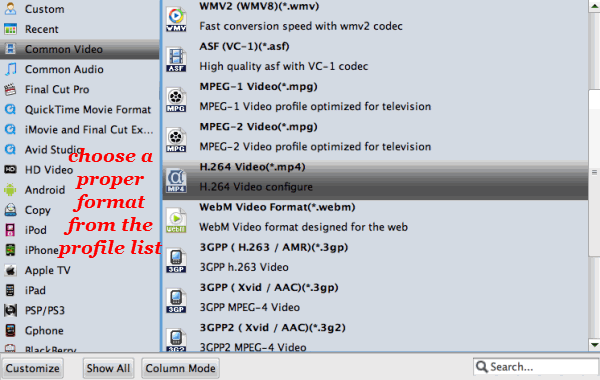
Click the "Format" and from the list, choose a right option as the output format. Here you can choose mov, mpeg-4, mpeg-2, flv, avi, mkv, wmv, etc as target format on Mac OS X Yosemite. iPad, Apple TV, PS3, Galaxy Tab, Nook HD, etc preset profiles are provides as well.

3. Start video conversion on Yosemite
Click "Convert" button to start converting kinds of video files to your target format. When the conversion is over, click "open" to locate the converted video files for playing, editing, sharing under Mac OS X Yosemite.
More features of the Yosemite Video Converter:
1. Edit Video Files> Open the video editing panel by clicking the "Edit" button and there you will be provided with many video editing features. For example, go to the "Trim" tab and drag the sliders to define the beginning and end time of the video file to cut it.
2. Video/Audio Settings> If you like, you can click "Settings" to change the video encoder, resolution, frame rate, etc. as you wish. Keep in mind the file size and video quality is based more on bitrate than resolution which means bitrate higher results in big file size, and lower visible quality loss, and vice versa.
Related Guides:
How to Play WMV on Mac OS X Yosemite
How to Install QuickTime 7 Pro For OS X Yosemite
Useful Tips
Copyright © 2019 Brorsoft Studio. All Rights Reserved.


