Loading DJI Zenmuse X4S 4K Video to Premiere Pro/FCP/Avid MC
Zenmuse X4S Camera is built in DJI Inspire 2. It can capture H.264 or H.265 video upto 4K. And if you plan to get the DJI Inspire 2 with Zenmuse X4S camera, you’d better read on to learn Zenmuse X4S 4K to FCP/Premiere Pro/Avid MC workflow, which ensures you handle Zenmuse X4S H.264 or H.265 recordings in Final Cut Pro X, Adobe Premiere Pro or Avid Media Composer simply and smoothly.
Based on our testing, a compressed output H.265 or H.264 in MP4 or MOV container from DJI Zenmuse X4S is not ideal for editing. What’s more, handling 4K files is extremely hardware intensive, from where we could then transcode DJI Zenmuse X4S H.265/H.264 to an editing codec for FCP, Premiere Pro or Avid Media Composer. What we can depend on is a professional 4K video converter like Brorsoft Video Converter for Mac.
Overall, the program is an easy-to-use yet all-in-one video conversion app which can be used as a DJI Zenmuse X4S video converter. With it, you can effortlessly transcode DJI Zenmuse X4S H.264 or H.265 to DNxHD, ProRes, MPEG-2 files, which will create an Avid MC, Final Cut Pro, Adobe Premiere Pro friendly file format keeping the original quality. For encoding Zenmuse X4S 4K video on Windows, please get Brorsoft Video Converter.
READ MORE:
Zenmuse X5/X5R to Final Cut Pro
DJI Mavic Pro 4K in FCP/Premiere/Avid
Zenmuse X5S H.265 to Davinci Resolve
DJI Spark Video to FCP/Premiere/Avid
DJI OSMO 4K to FCP/Adobe Premiere/Avid
DJI Phantom 4 4K to PowerDirector
DJI Inspire 4K to Corel VideoStudio
DJI Inspire 1 4K to FCP, Premiere and Avid
View DJI Drone 4K Video on TV
Transcoding DJI Zenmuse X4S MP4/MOV to Premiere Pro/Avid MC/FCP
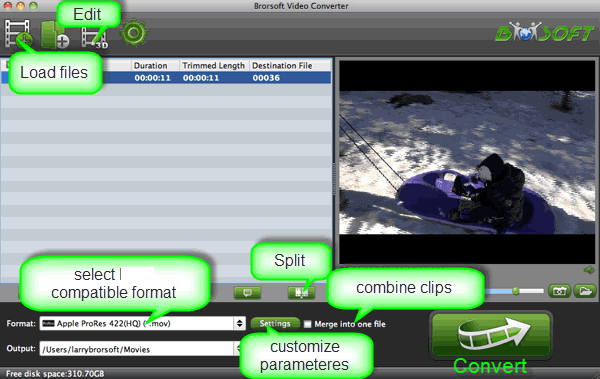
Step 1. Add video clips
Install the 4k video converter program and run it. Drag the 4K .mov, .mp4 files from Zenmuse X4S to the software. It supports batch conversion and joining multiple video clips into one file.

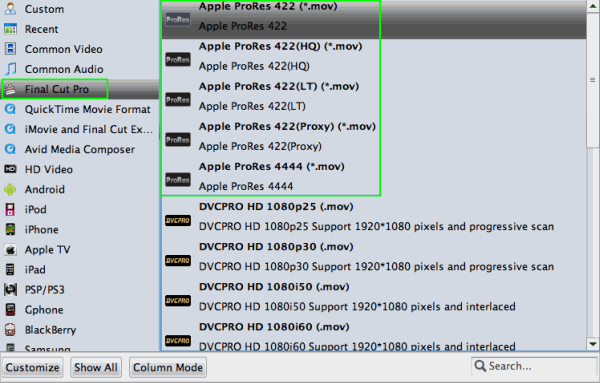
Step 2. Choose output format
Click the “Format” bar and select “Final Cut Pro> Apple PreRes 422(*.mov)”, “Adobe Premiere/Sony Vegas> MPEG-2(*.mpg)” or “Avid Media Composer > Avid DNxHD(*.mov)?” as output format.

Tip: Advanced Settings
You can click the “Settings” button and customize proper video/audio parameters if necessary. Video size, bitrate and fame rate are flexible and can be adjusted as you like. For easier editing, you can downscale 4K to 1080p. Of course, if you wanna get a 4K workflow on a power enough PC, you have keep the original video resolution.
Step 3. Start 4K video conversion
Hit the convert button to start transcoding Zenmuse 4k MOV/MP4 to ProRes or other editable codec.
After the conversion, click Open to get the output videos. These new files can be imported to Adobe Premiere Pro, Final Cut Pro X or Avid Media Composer for easier editing.
Useful Tips
- 5 Best 4K Video Converter for Mac
- Best 4K Video Downloader
- 4K Ultra HD Video Converter
- Downscale 4K to 1080p
- 4K workflow with FCP
- 4K workflow with iMovie
- 4K workflow with Avidemux
- 4K workflow with Premiere Pro
- 4K workflow with Avid MC
- 4K workflow with Sony Vegas
- 4K Workflow with After Effects
- 4K Workflow with DaVinci Resolve
- 4K Workflow with Premiere Elements
- 4K Workflow with Movie Maker
- 4K Workflow with EDIUS
- 4K Workflow with HitFilm
- 4K Downscaling to 1080p
- 4K Workflow with PowerDirector
- 4K Workflow with Pinnacle Studio
- 4K AVC-Intra to Premiere Pro
- DJI Mavic 2 Pro 4K in Premiere Pro/FCP/Avid Media Composer
- Upload 4K Videos to YouTube
- Upload 4K Videos to OneDrive
- Play 4K in VLC
- Play 4K in Plex
- Play 4K in QuickTime
- Play 4K on Android
- Play 4K on Xbox One S
- Play 4K on Apple TV 4K
- Play 4K on Vizio TV via Kodi
- Play 4K on Shield TV via Plex
- Play 4K on PC without Lag
- Play 4K in Windows Media Player
- Upload 4K Videos to YouTube
- VLC 4K Video Playback
Copyright © 2019 Brorsoft Studio. All Rights Reserved.


