- Store
- Products
- Downloads
- Resources
-

Upload and Share Videos (MKV/AVI/WMV/MPG/VOB) to Vimeo
Vimeo is a video platform that allows you to watch and upload videos created by the Vimeo user community. Movies, episodes of series, and sport events are often offered by broadcasters and companies. Although Vimeo doesn't have a list of supported file formats, get support from Vimeo forum, we know Vimeo does support most major and popular types. You may consider uploading videos to Vimeo, such as in MKV, AVI, WMV, VOB, MPG format. And now in this article, we will quickly walk you through a full guide. Learn how to.
Video File Formats, Codecs, Size, Resolution, Frame rate and Bitrate
Video File Formats:
As mentioned above, on Vimeo, uploading is not as much a question of file formats, but rather of video codecs used in the specific files. Thus, encoding the video correctly is more important than choosing the "correct" file type. However, the service supports all major video file extensions like: 3GPP, AVI, FLV, MPEG4, MOV, WebM, WMV
Video Codecs:
A codec is the format in which your video is encoded. We accept most major codecs, but for best results we recommend H.264 or Apple ProRes 422.
H.264
H.264 is a standard codec that balances high visual quality with efficient file size. It's a great starting point for encoding your videos as it ensures you'll get the most of our your upload quota while minimizing upload and conversion times. Be sure to choose the "High Profile" H.264 setting instead of "Main Profile."
Apple ProRes 422 (HQ)
This professional-quality codec ensures a high quality for your encoded video but typically results in a much larger file size than H.264. If you notice quality issues with your H.264 videos and have ample storage space on your Vimeo account, using ProRes may produce a better result.
Video Size:
If you are using a Vimeo Basic account, you can upload videos up to a size of 500MB per week (not per video!). Vimeo Plus members can upload videos up to 5GB per week, while members with a Vimeo PRO account have a limi of 20GB per week.
Every seven days, the upload space is refreshed and you can upload according to your quota again.
Video Resolution:
Videos come in all shapes and sizes but these are some of the most common formats.
| Format | Resolution (px) |
|---|---|
| Standard Definition (SD) 4:3 aspect ratio |
640 × 480 |
| Standard Definition (SD) 16:9 aspect ratio |
640 × 360 |
| 720p HD 16:9 aspect ratio |
1280 × 720 |
| 1080p HD 16:9 aspect ratio |
1920 × 1080 |
| 2K 16:9 aspect ratio |
2560 × 1440 |
| 4K UHD 16:9 aspect ratio |
3840 × 2160 |
| DCI 4K UHD 17:9 aspect ratio |
4096 × 2160 |
| 4K Monoscopic 360 2:1 aspect ratio |
4096 × 2048 |
| 4K Stereoscopic 360 2:1 aspect ratio |
4096 × 2048* |
Tip: More details about bit rate, frame rate, audio etc. can be found in Vimeo's Compression Guidelines.
How to Optimize Videos for Uploading to Vimeo
Optimizing your videos to upload them according to the Vimeo standards and guidelines isn't difficult at all. All you need is a properly encoded video and a trustworthy and reliable video converter. Brorsoft Videomate is the right choice.
The many different options given allow you to optimize your video according to the compression guidelines when it comes to bit and frame rate, and screen size. And if you don't wanna adjust the video audio settings manually, you can simply select the optimal preset for Vimeo provided by Brorsoft Videomate. Furthermore, you can cut videos that are too long, or change the audio or video quality to reduce the file size. For Mac users, please turn to Brorsoft Videomate for Mac to convert and upload your video files to Vimeo on Mac (including macOS Sierra). Now download the right version of the program and follow the guide below..


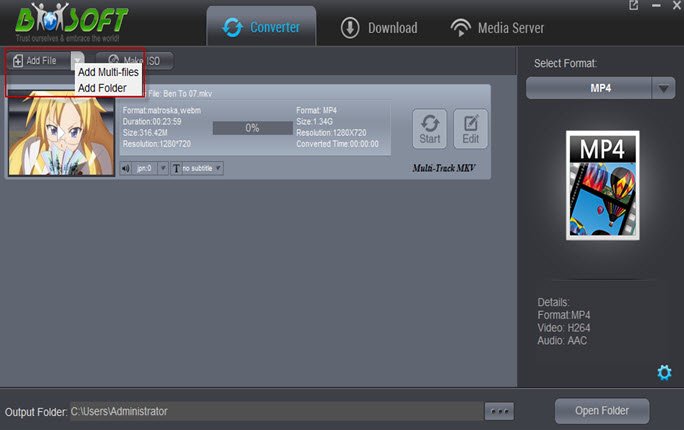
1. First download and install Brorsoft Videomate. When complete, start the program from Start menu or Windows desktop and then drag and drop your AVI, MKV, VOB, etc. files you want to upload to vimeo to the software.
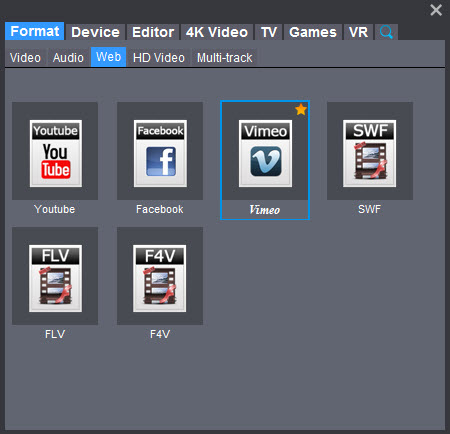
2. Specify the output video format. You don't need to be confused about what format to choose. Video preset for Vimeo has been provided. Just click "Select Format", go to "Format > Web" category and set "Vimeo" as your output video format.
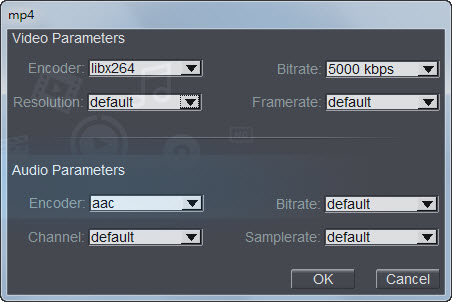
3. (optional) If you wanna reset the video audio parameters for Vimeo, you should go to "Settings" and then adjust the resolution, frame rate, bit rate and codec, etc.
4. Start converting AVI/MKV/VOB/MPG to Vimeo
Finally, go back to the main interface and click the "Start" button to begin converting AVI/MKV/VOB to Vimeo highly compatible H.264 MP4 video files. When the conversion is done, click "Open" to locate the converted videos and prepare for Vimeo.
Tip: If you wanna learn more about how to compress videos for Vimeo, YouTube, please link to Vimeo/YouTube Video Compression Tutorial.
Steps to Post Videos to Vimeo
To get started uploading your video on Vimeo, follow the steps below:
Step 1: Log Into Your Account.
The first thing that you should do is visit the Vimeo website. If you already have an account, log into it by clicking the login link. If you don't have an account, then you will need to register.
Step 2: Uploading the Video.
Click the "Upload Video" button which is located on the home page of the site. You will also be able to find the same link in the navigation bar which is under the Upload heading.
Step 3: The Upload Page.
Once you click the upload link, you will be taken to the upload page. This can be confusing at times. You need to read through this and follow the directions. You will need to ensure that you are permitted to upload the videos you are interested in.
Step 4: Selecting the File.
Click the "Choose a File to Upload" button and this will launch an upload dialog box. Choose the file that you want to upload and then click on "Select". As soon as you click the button, the video will start to be uploaded straight away.
Step 5: Adding the Basics.
A. Adding a description to your video will allow for viewers to know and learn more information about your video before viewing. This will display at the bottom of the video. Be sure to add a unique description to help your video to stand out.
B. Tags allow other users to see your video by linking common and searchable words associated with your video. Other videos will then often be seen together in the "Recommended videos" sidebar if they have similar tags.
Step 6: Privacy Settings.
Vimeo respects your videos and your right to decide who watches them. Privacy options allow you to upload videos and choose who can see them. To access the privacy settings of your video, click Settings under your video on the video page, then click the Privacy tab.
Step 7: Processing Conversion.
As soon as the video is uploaded, the video will then need to be processed. You can close this page if you want, and Vimeo will handle the conversion automatically. Once the video has finished converting, the service will then email you once the conversion has finished.
Related Products
Video mate


Useful Tips
Social Connection
Copyright © 2019 Brorsoft Studio. All Rights Reserved.