- Store
- Products
- Downloads
- Resources
-

Avid Media Composer: Importing Videos, Projects and Media under Mac OS X
Media Composer, frequently referred to as "The Avid", is a type of computer software application known as a Non-linear editing system (NLE). The application features have increased to allow for film editing, uncompressed standard definition (SD) video and high definition (HD) editing and finishing. Read on this article and learn how to import media into Avid Media Composer projects, so that you can work with images, video or audio clips stored on your computer. Whether you're new to Avid's popular non-linear editor or are a seasoned digital video professional just looking to better acquaint yourself with Media Composer.
For adding media files to Avid Media Composer, you can access files for import from any folder, disk, or drive source mounted on the desktop, such as a CD or DVD, fixed drive, removable drive, or network server. You can import more than one file at a time, including files of multiple types. For detailed instructions, and to get started importing media into Media Composer yourself, take a look.
To import files:
1. If you created one or more Import settings, select the Import setting you want to use from the Settings list in the Project window.
2. Do one of the following:
- Double-click Media Creation in the Settings list.
- Select Tools > Media Creation.
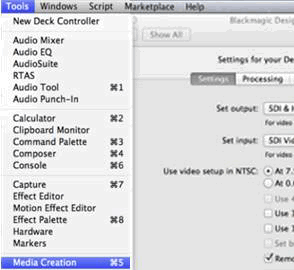
The Media Creation dialog box opens.
3. Click the Media Type tab.
4. Click the File Format menu, and select the format (MXF or OMF).
Tip: If you are working in an HD project, you cannot select OMF as a file format. MXF is selected by default.
5. Click the Import tab.
6. Select the resolution and target drives.
7. Click OK and close the dialog box.
8. Open the bin in which you want to store the imported files.
9. Select File > Import.
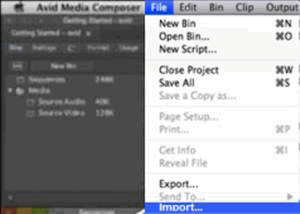
The Select files to Import dialog box opens.

10. Click the Files of the Enable menu, and select an import file type to display only files of the selected file type in the source file list.
11. Click Options to open the Import Settings dialog box, and then do the following:
a. Select the options you want and click OK to save the settings.
b. Close the Import Settings dialog box and return to the Select Files to Import dialog box.
12. Use the From menu to locate the folder containing the source files.
13. For graphics and video files, click the Resolution menu, and select a resolution for the imported media.
The resolution matches the resolution selected on the Import tab of the Media Creation Settings dialog box. If you select a different resolution, the resolution is also selected in the Media Creation Settings dialog box.
OMFI and AAF files do not convert DV 25 to DV 50 or DV 50 to DV 25.
Your Avid editing application imports XDCAM media at the native resolution of the media on the XDCAM disc. The system ignores other video resolution settings.
14. Click the Single/Dual Drives button and select a destination drive for the imported file.
The target drive or drives match the drives selected on the Import tab of the Media Creation Settings dialog box. If you select a different drive, the drive is also selected in the Media Creation Settings dialog box.
15. For an XDCAM disc, type a name in the Disk Label text box.
Tip: Your Avid editing application uses the disk label for operations such as Batch Import, where you are prompted to insert a specific XDCAM disc that holds the files you want to import. A disk label is required in order to import XDCAM media.
16. Select files or deselect files from the source file list by using the standard selection methods for your operating system.
17. Click Open.
When the system finishes importing the files, the clips appear in the selected bin.
Converting Media files that do not supported by Avid to DNxHD
If you are in this situation that your video clips are not in Avid MC natively supported files types, then you need a Mac Converter tool to convert your source files to something (e.g. DNxHD) that your Avid Media Composer will accept. Brorsoft Video Converter for Mac is such a Mac app to perform not only as a Video to Avid MC Converter, but also as a Camera Video Converter for FCP, as well as a Sony Footage Converter for Mac, or a Canon/Panasonic MXF Converter.
Basic steps to convert videos to DNxHD for Avid on Mac OS X
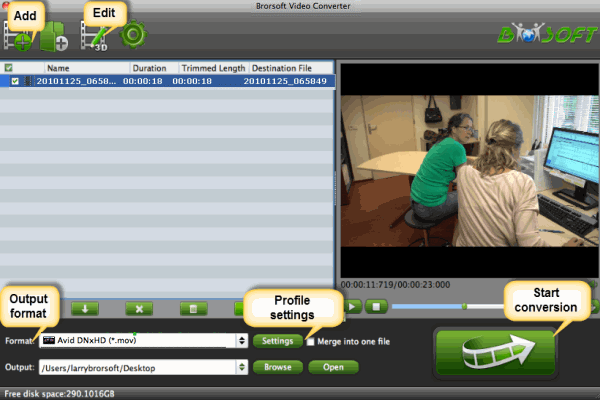
1. Click "Add video" or "Add from folder" to navigate and load your source media files including AVI, MKV, WMV, MOV, MXF, MTS, XAVC S, VOB, FLV...
2. Hit Format menu, the Format dialogue box pops up. Choose "Avid DNxHD (*.mov)" as output format from "Avid Media Composer" catalogue.
3. Press "Convert" button to transcode different videos to DNxHD MOV for using in Avid MC.
In this way, you can import and edit any media flies in Avid Media Composer smoothly on Mac OS X(macOS Sierra inlcuded).
Related guides:
How to import MXF files to Avid MC || How to edit MTS footage in Avid MC
How to import XAVC to Avid MC || How to edit AVI Videos in Avid MC
How to mport GoPro Video to Avid MC || How to import VOB files to Avid MC
How to import MKV to Avid MC || How to edit MPG Videos in Avid MC
How to import MP4 files to Avid MC || How to import TS files to Avid MC
How to edit H.264 cips in Avid MC || How to edit H.264 cips in Avid MC
Related Products
Video Converter for Mac


Useful Tips
Social Connection
Copyright © 2019 Brorsoft Studio. All Rights Reserved.