- Store
- Products
- Downloads
- Resources
-

Tricks Using WMV Video in PowerPoint for Mac

Using video in a PowerPoint can greatly enhance a lecture. Before deciding to include video clips be sure to consider the file type of your video. If you wanna insert WMV to PowerPoint for Mac, you need some preparation first.
Generally, you can insert a WMV movie into your Mac PowerPoint presentation using the Insert, Movie, From File command or the Movie toolbar, but PowerPoint won't let you select a WMV movie.
The basic reason is that PowerPoint actually can't play movie files at all, either on Mac or PC. Instead, it depends on the system software (QuickTime on Mac, Windows Media Player or the older MCI Media Player on Windows) to play movies. QuickTime doesn't support WMV files, so PowerPoint Mac won't even allow you to insert them normally. To get rid of the issue, there are two solutions for you.
Method 1. Simply change file extension
Change file extension from .wmv to .mov. By changing the file's extension, you make PowerPoint think that it's a QuickTime movie, even though it's not. QuickTime's smart enough to work out that it's something else, based on the content of the file, not the extension.
Method .2. Convert WMV to QuickTime .MOV
In order to play WMV in PowerPoint for Mac with no restriction, the most efficient way is to convert WMV to MOV format, which is fully supported by Mac PowerPoint. This solution will ensure that you can embed WMV movie into Mac PowerPoint slide successfully.
Recommended Tool: Brorsoft Video Converter for Mac
This is a nice small took kit for Mac users to transcode between WMV, AVI, MKV, TS, VOB, MPG, MTS, M2TS, MOV, MP4, TOD, MOD, TiVo, etc. It also features basic editing features such as trimming, merging, cropping, watermarking, and audio replacing facility. By using the trimming action you can clip a specific duration from a video clip and turn it into PowerPoint preferred format.

Simple clicks to convert WMV to Mac PowerPoint supported formats
Step 1. Load WMV videos
Click the Add button to load .wmv files from your computer or other devices like USB device. You can also directly drag the files you want to convert to the main interface. Note that batch conversion is supported so you can add as many files as you like at one time.

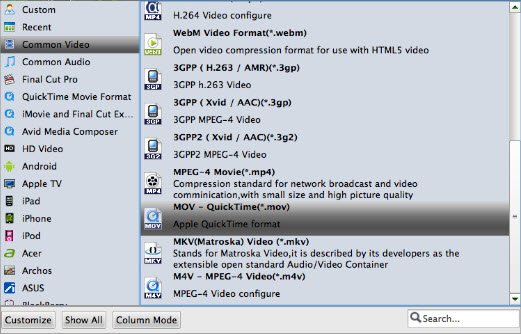
Step 2. Select output format
Click Format bar, from its drop-down list. To insert WMV to Mac PowerPoint, chose QuickTime best compatible "Common Video -> MOV - QuickTime (*.mov)" as the output profile format.
Step 3. Edit the WMV videos (Optional)
Click the "Edit" button and edit your videos before processing format conversion. There are main seven functions available: Trim, Crop, Text Watermark, Image/Video Watermark, Effect, Audio Editor, and Subtitle.
Step 4. Start the conversion
Click "Convert" to begin converting WMV to PowerPoint compatible video files on Mac OS X. After the conversion, you will get the desired videos in the destination folder.
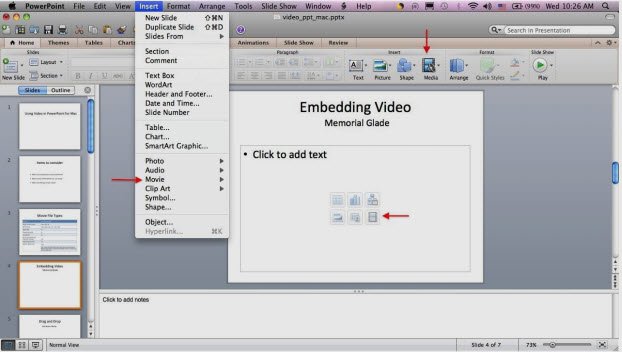
Step 5. Insert your converted WMV video to PowerPoint for Mac
PowerPoint for Mac embeds video files by default. The simplest way to do so is to drag and drop the file from its location on your computer to the slide where you want it to play.
Related Products
Video Converter for Mac


Useful Tips
- Import WMV to iTunes
- Convert WebEx WRF to WMV
- Convert WebEx WRF to MP4/MOV/MKV/AVI/MPG
- Add Subtitles to WMV
- Import WMV to iMovie
- Insert WMV to Mac PowerPoint
- Import WMV to Final Cut Pro
- Import WMV to Avid MC
- Import WMV to Premiere Pro
- Import WMV to After Effects
- Import WMV to Sony Vegas
- Edit WMV in VirtualDub
- Convert WMV to MOV
- Play WMV on Blu-ray Player
- Play WMV on Plex
- Play WMV on Kodi
- Play WMV on Yosemite
- Play WMV on PS4/PS3
- Play WMV on Apple TV
- Play WMV in VLC on Mac
- Play WMV on QuickTime
Social Connection
Copyright © 2019 Brorsoft Studio. All Rights Reserved.