- Store
- Products
- Downloads
- Resources
-

How to Import nanoFlash MXF recordings to Final Cut Pro
The nanoFlash is a portable HD/SD recorder/player designed to mount on a camcorder, recording higher quality images than the camera itself, using the camera's uncompressed 4:2:2 HD-SDI or HDMI output recording at bitrates up to 180 Mbits/sec. And the footage can be stored in either Quicktime (MOV), MXF, or MPG file formats. Since nanoFlash supports the native QT and MXF files used by most NLEs, you can play/edit the footage directly off the CF card without transcode or rewrap of the data. The point here: how about the nanoFlash MXF and Final Cut Pro compatibility? Well, some incompatible issues still exist there.
Q: We've shot a ton of media from a Sony EX3 camera and recorded it out the HD-SDI to a NanoFlash. We're considering editing on FCP. We're trying to get footage off a CF card recorded with a NanoFlash, but these cards can't be read by Log & Transfer or XDCAM EX Clip Browser. We can't import nanoFlash .mxf to FCP. Any other ideas?
If fact, nanoFlash currently supports three file formats: MOV (Quicktime), MXF, and MPG. And as far as we know, MOV is mainly for Apple Final Cut Pro and some others; MXF is for AVID, Sony Vegas, Edius and others; MPG is for creating files compatible with DVD and Blu-ray burning software. That explains why Final Cut Pro can't ingest nanoFlash MXF files directly. If you've recorded MXF files with nanoFlash and want to import nanoFlash MXF into FCP, what you need to do is to convert nanoFlash MXF to ProRes, Final Cut Pro favorable format first.

To get the work done, the best program we can recommend is Brorsoft MXF Converter for Mac, which can convert nanoFlash MXF files to ProRes 422, ensuring maximum editing quality and efficiency when working with Final Cut Pro. The Mac MXF to ProRes converter can also convert MXF footage from camcorders (like Panasonic, Sony and Cannon) for editing in Final Cut Pro 6/7, Final Cut Pro X, Final Cut Express, iMovie, Avid MC, Adobe Premiere Pro etc. Just download it and follow the tutorial below to finish the task.
Download nanoFlash MXF Converter for Mac:
 (Note: Click here for OS X 10.5)
How to Convert nanoFlash MXF to ProRes for Final Cut Pro
Step 1: Import nanoFlash MXF recordings to the nanoFlahs MXF Converter Mac.
Note: Before conversion, you need to copy the ones you want to your hard drive, then click the "add files" button to import nanoflash MXF videos.
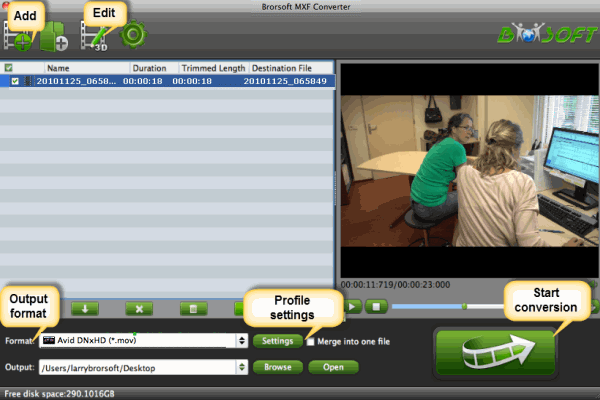
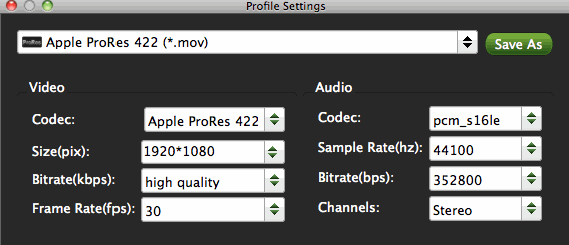
Step 2. Click the Format bar, and move mouse cursor to "Final Cut Pro > Apple ProRes 422 (*.mov)" as output format.

Step 3. Click "Convert" button to start transcoding nanoFlash .mxf files to ProRes MOV for Final Cut Pro X or FCP 6/7 under Mac OS.
Additional Tips:
1. Settings - click to set video resolution(1920*1080/1440*1080/1280*720/720*480), bitrate(from 1Mbps to 20Mbps), frame rate (24p/30p)
2. Editor (next to "Add" icon)- click to set deinterlace, trim, crop, effect, subtitles, etc.
Once the nanoflash files are converted to FCP workable format, just click "Open" to find out the output files. Afterwards, launch Final Cut Pro, and add the output files to Final Cut Pro for smooth editing.
Additional Tips - If you recorded videos in QuickTime (MOV) or MPG file formats and want to import these nanoFlash recordings into Final Cut Pro or iMovie for smooth editing, Brorsoft Video Converter for Mac will be the best assistant for you.


Related Guides:
Best Way to Merge MXF files
Import Canon MXF files to FCP
Edit Canon C300 MXF in Premiere Pro
How to Convert MXF to iMovie on Mac
How to Ingest MXF footage to Premiere Pro
Convert Panasonic P2 MXF to FCP Mac OS X
Convert Canon C300 MXF files to After Effects
Import Canon C300 MXF files to Sony Vegas Pro
How to Import nanoFlash MXF to Avid Media Composer
Related Products
MXF Converter for Mac


Useful Tips
- Convert MXF to MOV
- Play MXF in VLC
- Play MXF in Media Player
- Upload MXF to Vimeo
- Upload MXF to YouTube
- Convert MXF with Handbrake
- Convert MXF to AVI/WMV/MPEG
- Convert MXF to ProRes High Sierra
- Transcode P2 MXF to ProRes
- Import MXF to After Effects
- Convert Canon MXF to Avid
- Play Edit Canon MXF on Mac
- Import MXF to iMovie
- Import MXF to VirtualDub
- Convert MXF to Premiere
- Convert MXF for Mac editing
- Convert MXF to Pinnacle Studio
- Convert MXF to PowerDirector
- Load Sony MXF to Final Cut Pro
- Edit MXF files with Davinci Resolve
- Sync MXF with Pluraleyes 3/3.5/4
- Edit MXF in Camtasia Studio 8/7
- Convert MXF to Windows Movie Maker
Find us on Facebook

Adwards

Copyright © 2019 Brorsoft Studio. All Rights Reserved.