- Store
- Products
- Downloads
- Resources
-

HEVC/H.265 Not Playing on Kodi - Solved!

Kodi has become the best home entertainment system available, and all for free. Originally called XBMC (Xbox Media Center) that can be installed on many different hardware platforms from a cheap desktop/laptop computer to a Raspberry Pi. There are even installs for the Fire TV Stick. Whereas, we found many guys are complaining the H.265 playback issues on Kodi. Although the new version of Kodi supports HEVC/H.265 codec, it's still not easy to play H.265 on Kodi as we expect. In this article, we would offer some tips to solve (4K) HEVC on Kodi problems.
Typical H.265 on Kodi issues:
Q1: HEVC not playing in Kodi
When I play one of HEVC files on the standard android video player, they play fine, but when I try to play the HEVC in Kodi I just get a distorted green screen with just the audio playing.
Q2: H.265 on Kodi 17
I recently upgraded to kodi rc but cant play h.265 videos now. Any help?
Kodi (version 14 onwards) offers decoding support for HEVC. (Refer to Kodi HEVC support here) However, lag, out of sync and drop frames issues still exist when playing H.265 video files. Worse still, if your streaming box or devices support HEVC hardware decoding, or have too low power SoCs to support smooth software playback, you will fail to copy H.265 videos to Kodi for watching.
Best Solution to Play H.265/HEVC on Kodi
For those guys who are looking for an effective solution to watch H.265 movies on Kodi, a good suggestion is to transcode H.265 to H.264, a more compatible file which is widely accepted by Kodi and also Kodi available devices and applications. Here, you can get the job easily completed with this professional yet and easy-to-use H.265 decoding tool- Brorsoft Video Converter.
The program fully supports handling both 4K/HD H.265 files wrapped in either MP4 or MKV container file format. Thanks to its batch conversion mode, you can batch import multiple H.265 files into the application for conversion at one time. With the application, you can easily produce Kodi or Kodi available devices most compatible H.264 MP4 file format with perfect quality and super fast encoding speed. For Mac users, you can switch to download the Mac version- Video Converter for Mac to complete the same conversion on Mac (macOS High Sierra included).


Steps to Convert H.265 to KODI More Friendly Format
STEP 1. Start Brorsoft video converter, drag and drop the H.265 files to the software window to import.
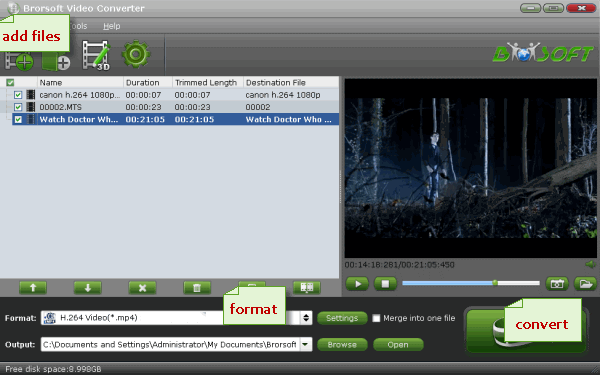
STEP 2. After the files are added, click Format > Common Video and set output video format as H.264 mp4. The reason H.264 mp4 is the target format is that it is full supported by Kodi and by packing the videos in mp4, the file size will be reasonable small and the video quality remains good.

Tip: There are also some optional tinkering you can take to make the videos look better, such as changing the aspect ratio or specifying the video resolution. Just click the Settings icon to do it.
STEP 3. Finally, hit the Convert button to start converting H.265 videos for Kodi playback. The program supports hardware encoding acceleration, so that you can get up to 6x H.264 codec encoding speed as long as your computer runs on Graphic card that supports Nvidia CUDA or AMD App technology.
After the conversion is completed, transfer the converted videos to Kodi for enjoyment.
How to Add Videos to Kodi?
1. Download and install Kodi on your computer. After that, open Kodi.
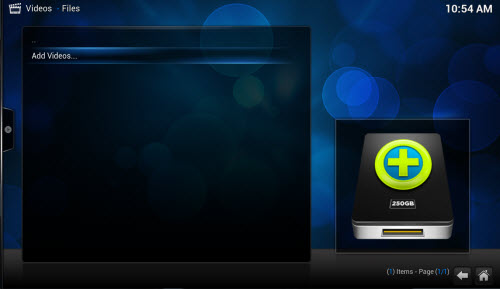
2. Select "Videos" in the home screen menu.
3. Select Files, then select "Add Videos".
4. Click on "Browse" button. From this requester you can select the location where your Movies are located on your system. You can also choose a network drive if your Movies are there, this tutorial will use the network drive option and we will select "Windows network (SMB)".
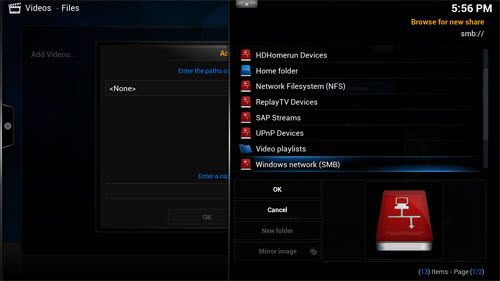
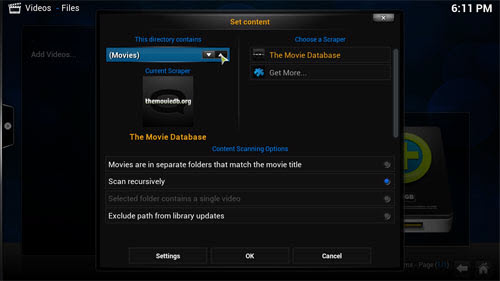
5. In the next screen you should see the directories within your selected directory. If this is the right directory select "OK". If all is ok then select "OK" again. In the next screen is where we tell Kodi what our source directory contains, in this case its "(Movies)". When your happy with the settings select "OK".
6. Next screen is refresh info for contents of selected directory, select "Yes". When you've selected ok you will be presented with this next screen, keep an eye on very top almost to the right as this updates the database with info about the films it finds. This item can take a long time depending on how many Movies you have in your collection.
When finished, some your movie library should be listed on the interface. Enjoy.
Related Products
Video Converter


Useful Tips
- HEVC/H.265 Executive Summary
- Differences: H.265 and H.264
- View/Edit HEVC on macOS High Sierra
- H.265 Converter macOS High Sierra
- Play H.265 in Windows Media Player
- Join or Split H.265 VIideos
- Play H.265 in MX Player
- Play H.265 in KMPlayer
- Play H.265 in VLC
- Play H.265 on Android
- Play H.265 on Windows 10
- Play H.265 on Surface Book/Pro
- Play H.265 on iPhone 8/7 iOS 11
- Play H.265 on Xbox One
- Play H.265 via Plex
- Play H.265 on Kodi
- Upload H.265 to Vimeo
- Upload H.265 to YouTube
- Play H.265 in QuickTime
- Play H.265 in Neuxs Player
- Play H.265 4K in UHD TV
- Play H.265 4K in MPC-HC
- Play H.265 on WD TV
- Play H.265 on Samsung TV
- Play H.265 on Chromecast Ultra
- Convert H.264 to H.265
- Convert H.265 to H.264
- Convert H.265 to M3U8
- Convert H.265 to ProRes Windows
- Convert H.265 to MPEG2 for DVD
- Convert H.265 MP4 to HEVC MKV
- Add H.265 Videos to iTunes
- H.265 to Final Cut Pro
- H.265 to Pinnacle Studio
- H.265 to Corel VideoStudio
- H.265 to Edius Pro
- H.265 to Avid Media Composer
- H.265 Codec and iMovie
- H.265 Codec and Sony Vegas
- H.265 Codec and After Effects
- H.265 Codec and Lightworks (Pro)
- H.265 Codec and Windows Movie Maker
- H.265 Codec and Premiere Elements
- H.265 Codec and Premiere Pro
- H.265 Codec and Davinci Resolve
- Export Final Cut Pro to H.265
- Export Premiere Pro CC to H.265
- VLC Convert H.265 to H.264
- Play iPhone HEVC in Windows Media Player
- Encode H.265 with FFmpeg Alternative
- Solve Handbrake H.265 encoding issue
Social Connection
Copyright © 2019 Brorsoft Studio. All Rights Reserved.