- Store
- Products
- Downloads
- Resources
-

How to Import & Export Videos in Adobe Premiere Pro (Pro CC)
Adobe Premiere Pro is powerful, customizable, and high-performance nonlinear editing software for video professionals. While, if you are new to Premiere Pro and have no idea how to import and export media with Adobe Premiere Pro, you're in the right place. This tutorial mainly discusses how to import and export videos in Adobe Premiere Pro (Premiere Pro CC).
Part I. How to Import Videos to Adobe Premiere Pro
The two simple ways to import footage/clips:
This one's easy:
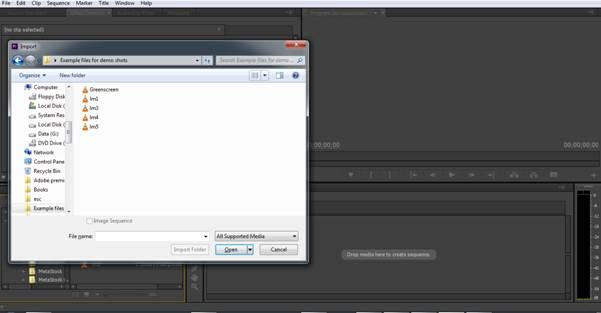
File>Import..., or
Use the Media Browser
The first option is as simple as it gets, and Premiere Pro does whatever it has to do once you select your clip.
The second option is slightly more hands on. If you're having trouble with the first method, try the second one. Once you select the folder your footage rests in, you can import it (Windows - Right Click). The additional option you have is to choose the file type, under the heading: View As...
Most of the time, Adobe Premiere Pro will recognize the file type (codecs) automatically and will only give you limited options to choose from. If you're having trouble here, you might have inadvertently left out some files from your camera folder.
As a general rule of thumb: Copy ALL the files from the media folder (written to the media card while recording) to your source footage drive.
These files might not always be useful, but are hardly detrimental. And, they don't take up much space. Don't get lazy.
Tips: Can't Import video to Premiere Pro?
First look at the supported file formats of Adobe Premiere Pro:
| Supported native video and audio formats for importing to Premiere | |
| Format | Details |
| 3GP, 3G2 (.3gp) | Multimedia container format |
| AAC | Advanced Audio Coding |
| AC3 | Including 5.1 surround |
| AIFF, AIF | Audio Interchange File Format |
| Apple ProRes | Apple video compression format |
| ASF | NetShow (Windows only) |
| ASND | Adobe Sound Document |
| AVC-Infra | Panasonic codec |
| AVI (.avi) | DV-AVI, Microsoft AVI Type 1 and Type 2 |
| BWF | Broadcast WAVE format |
| DNxHD | Supported in native MXF and QuickTime wrappers |
| DNxHR | DNxHR LB, DNxHR SQ, DNxHR TR, DNxHR HQ, and DNxHR HQX |
| DV | Raw DV stream, a QuickTime format |
| GIF | Animated GIF |
| H.264 AVC | Various media that use H.264 encoding |
| HEVC (H.265) | H.265 media with resolutions up to 8192x4320 |
| M1V | MPEG-1 Video File |
| M2T | Sony HDV |
| M2TS | Blu-ray BDAV MPEG-2 Transport Stream, AVCHD |
| M2V | DVD-compliant MPEG-2 |
| M4A | MPEG-4 audio |
| M4V | MPEG-4 video file |
| MOV | QuickTime format |
| MP3 | MP3 audio |
| MP4 | QuickTime Movie, XDCAM EX |
| MPEG, MPE, MPG | MPEG-1, MPEG-2 |
| MTS | AVCHD |
| MXF | Media eXchange Format. MXF is a container format that supports
|
| Native MJPEGs | 1DC |
| OMF | Audio Project Format |
| OpenEXR | Files in .EXR, .MXR, and .SXR formats |
| VOB | Container format in DVD media |
| WAV | Windows Waveform |
| WMV | Windows Media, Windows only |
If your media files does not meet the Premiere supported requirements, Premiere Pro CC will refuse to import it. Is there a solution to importing all video files to all versions of Premiere Pro? The answer is positive. There are two main ways to import media into Premiere, the media browser or the third-party components such as Brorsoft Video Converter.
Solution 1. Using Media Browser
The Media Browser gives you quick access to all your assets while you edit. Also, you can use the Media Browser to import clips copied from video storage media such as P2 cards, SxS cards, XDCAM disks, and DVDs.
Step 1. Select Window > Media Browser
Step 2. Select one or more files from the list of files. To select more than one non-contiguous file, Ctrl-click (Windows) or Command-click (Mac OS) the filenames. To select more than one contiguous file, Shift-click the filenames.
Step 3. Select File > Import From Browser, or right-click the file in the Media Browser and select Import. Alternatively, you can drag the file from the Media Browser into the Project panel, or drag the file from the Media Browser into a Timeline.
There are some exceptions to this, however, despite having a huge number of file types supported natively within Premiere, you will sometimes run into files that are not supported, FLV and MKV files being the most common ones. In this case, you'd better try the second solution.
Solution 2. Convert and Import Video to Premiere Pro with Brorsoft Video Converter
Brorsoft Video Converterr offers optimal preset for Premiere Pro. You can quickly and efficiently to convert multiple videos/footages like MTS, MXF, XAVC, XAVC S, MOV, VOB, MP4, WMV, MKV, TiVo, FLV, AVI, etc to Premiere Pro most compatible format for native editing. For Mac OS X users, Brorsoft Video Converter for Mac is the right choice.


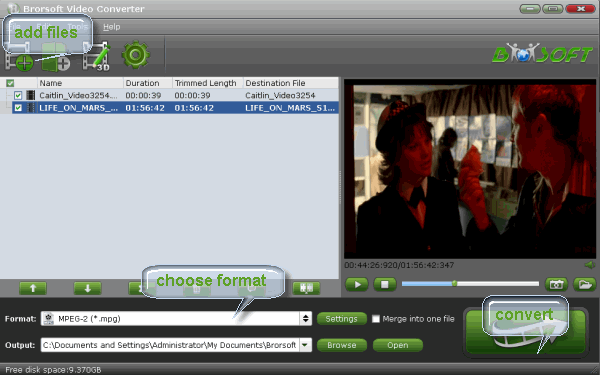
Step 1. Load videos to the program
click the "Add File" to load video you plan to import to Premiere (Pro CC) the program from your computer. Or you can also directly drag the video files into the program.
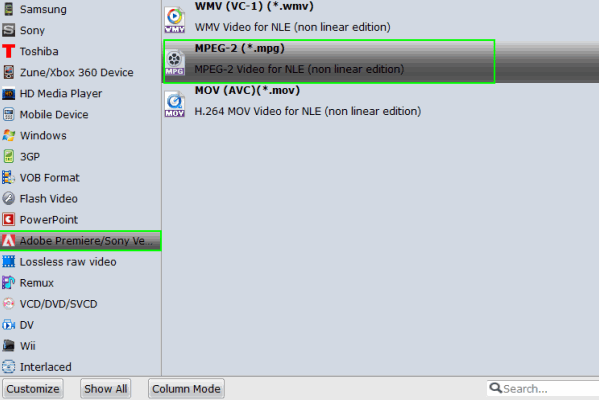
Step 2. Choose Premiere as output format
Hit the "Format" bar and select "Adobe Premiere/Sony Vegas > MPEG-2 (*.mpg)" as output format on the drop-down menu. It ensures the smooth editing with Adobe Premiere Pro.
Tip: Click the "Settings" button and customize proper video/audio parameters including Video size, resolution, bitrate and fame rate and more.
Step 3. Start conversion
After all necessary settings, hit "Start" button to start transcoding videos to transfer to Premiere Pro for editing. Once the conversion process shows in 100%, click Open to get the output videos. Create a project and start editing in Premiere Pro with ease.
Part II. How to Export Videos from Adobe Premiere Pro
When you have your edit completed and ready for delivery, there is only one step left - exporting for delivery. Exporting a finished video with Premiere Pro is an absolute essential skill that is required to finish any edit.
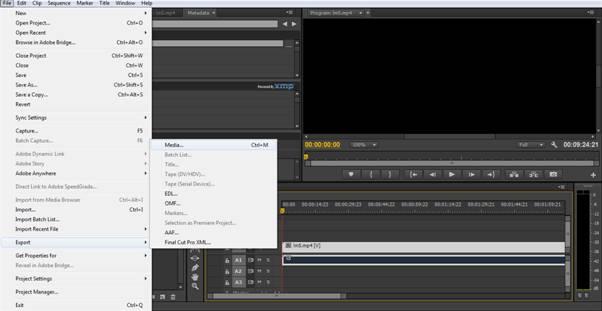
To export a video in Premiere Pro go to "File > Export > Media." You could also press the shortcut key "control M" on PC, or "command M" on Mac. Make sure your sequence that you want to export is selected when you do this.
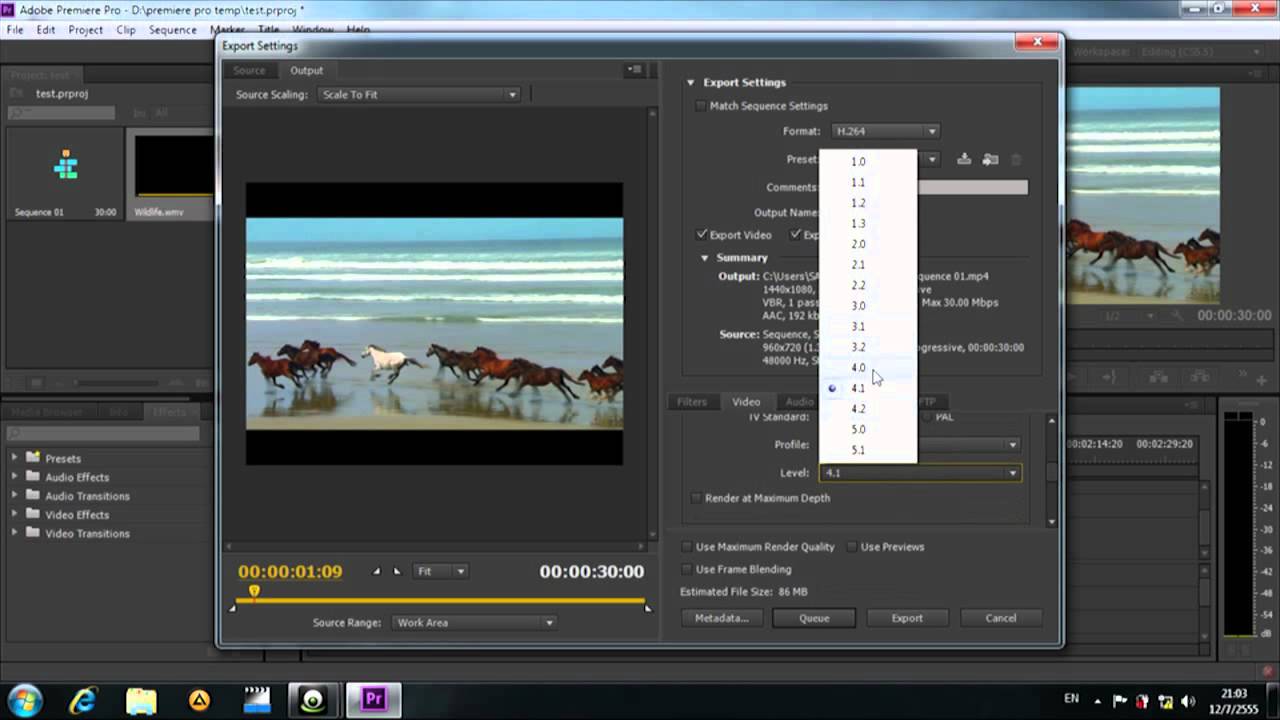
This will bring up your export settings window. In this window, you'll select your desired settings or presets for the video before sending it to Media Encoder for exporting.
The first thing to think about when exporting a video is to think about where the video will be delivered and how it will be viewed. Are you going to upload to Youtube and Vimeo? Are you going to burn it to a DVD? Are you going to give the client a highly compressed rough copy to watch on their phone? The delivery destination is very important on deciding what the settings need to be. There are loads of useful presets already pre-installed with Premiere Pro and Media Encoder. You can use these presets to quickly choose settings for your exported file.
If you want to bypass these custom settings and export with the EXACT settings of your sequence, you can select "match sequence settings" at the top. That will change your export settings to exactly match your sequence settings, although I don't recommend this because most delivery destinations require codecs other than your common editing or intermediate codec.
For this example, we'll be exporting from Premiere Pro to upload to Vimeo. Note, these video export settings for Vimeo are applicable for other online video services as well, such as YouTube. The best setting for web playback is the H.264 codec. So we'll select our format as H.264.
Click the output name to specify an output name for the exported video file. Make sure that "export video" and "export audio" are both checked so the file has both video and audio.
Now, you can select one of two Premiere Pro export options: "Queue" or "Export."
Selecting "Queue" will send you to Media Encoder with the sequence added to a queue. Then, all you have to do is press the green play button at the top to start the export. This is good if you want to add multiple Premiere Pro sequences to export at the same time. This also allows you to continue working in Premiere Pro while Media Encoder exports in the background. I usually use this method of exporting.
Selecting "Export" simply exports the sequence right from that window. You will not be able to use Premiere Pro while it is exporting this way.
That's it! You just exported your finished video.
Related Products
Video Converter


Useful Tips
- 4K vs 1080p
- iMovie Crash Solution
- How to Export iMovie Projects
- Convert WeChat Audio to MP3
- Batch Convert Videos with Handbrake
- Media Servers & Media Streamers
- Sites to Download MP4 Movies
- Solve MKV No Sound Problems
- Fix Out-of-Sync Audio in VLC
- Speeding up macOS Sierra
- Deinterlace 1080i Video
- Deinterlace Video with Handbrake
- Speed up video conversion
- Brighten A Dark Video
- Stream iPhone Media to TV
- Mirror Your PC on a TV with Chromecast
- Play Any Video on DVD Player
- Import/Export Videos in Premiere Pro
- Compress Videos for Use in Snapchat
- Fastest HEVC/H.265 Decoder and Encoder
- Video Converter for macOS Mojave
- Video Converter for macOS High Sierra
- Video Player for macOS High Sierra
- 5 Best Video Converter for Apple TV 4K
- Top 3 VOB Converter
- Top 3 VR Player for iPhone
- Top 5 MKV to iPhone Converter
- Top 5 Free Video to GIF Converter
- Top 5 Free Video Converter 2018
- Top 5 Free Screen Recorder 2017
- Top 5 Best Free 3D Video Players
- Top 5 Best 4K UHD Video Players
- Top 3 Fastest Video Converter
- Best VOB Players for Mac
- Top 3 WMV Players for Mac
- Free Video Converters for Windows
- Free Video Converters for Mac
- Best MXF Converter for Mac
- Best H.265 Encoder and Decoders
- Top 5 Video Players for Windows
- Top 5 Video Editors in Mac
- Top 5 Video Editors in Windows 10
- Apple ProRes Converter Windows
- Best GoPro Video Converter
- Best 3D Video Converter
- VR Video Converter macOS Sierra
- Best Free MOD Converter
- Top 5 Best MKV Splitter
- Best PVR Video Converter
- DivX Converter Alternatives
- Adobe Media Encoder Alternative
- Apple Compressor Alternative
- Windows Media Player Alternatives
- MPEG Streamclip Alternative
- Best ClipConverter Alternative
- AnyMP4 Video Converter Alternatives
- cTiVo Alternative for macOS High Sierra
- Best VLC Player Alternatives
Video Software Review
Software Alternative
Social Connection
Copyright © 2019 Brorsoft Studio. All Rights Reserved.